|
|
|
|
|
|
|
|
|
|
|
|
![]()
![]()
![]()
![]()
![]()
![]()
| Exchange Upgrade - Nov 27, 2016 |
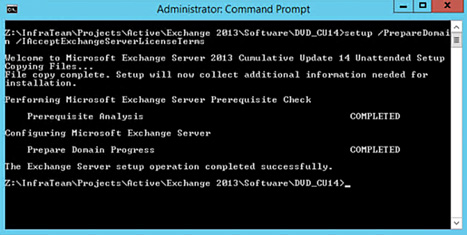
 I'm currently in the process of moving our company's email from being hosted on-site to being in the cloud. The first step in that process is to setup a hybrid server which will bridge the gap between on-site and off-site. Recently I did just that and thought I'd share the process. While Exchange 2016 is out, I opted instead to install an Exchange 2013 hybrid server into our existing environment. That existing environment consisting of Exchange 2010, two sites, with a DAG and CAS server in each site. All external email is being forwarded through a smart host. Here then are the steps I took:
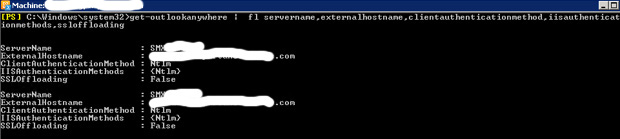
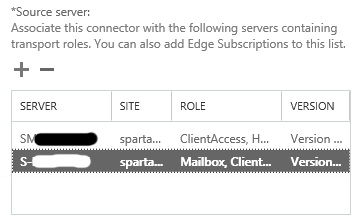
This is where I encountered the first problem. Email from our other site was not going out to the Internet and was queuing up. After a bit of a scramble I found the solution. I simply needed to add the new Exch 2013 server as an authorized source server on our Internet send connector:
After all this was done I had a functioning Exchange 2013 server. It was proxying client requests back to the 2010 servers successfully. However I noticed a problem when I modified the DNS alias we used for our SMTP mailer type programs and applications to point to the new server. These automated messages weren't going through. Doing some tests with Telnet showed the server was rejecting them. So I did some digging and found an article which was the solution. I had to create a new receive connector to handle these anonymous emails. I might have been able to modify the permissions on the default connector, but felt it was better to create a purpose specific connector instead. I followed the article exactly, but was still getting errors. Did some more digging and found this article. Once I made that change everything was working. At this point we're going to run this environment for a few weeks to make sure everything is good. After that the next step will be to run the Hybrid Configuration Wizard and try and get mail working between the on-site mailboxes and the hosted mailboxes. I'll detail that process on here at that point. |
| A Test of Will - Oct 22, 2016 | |||||
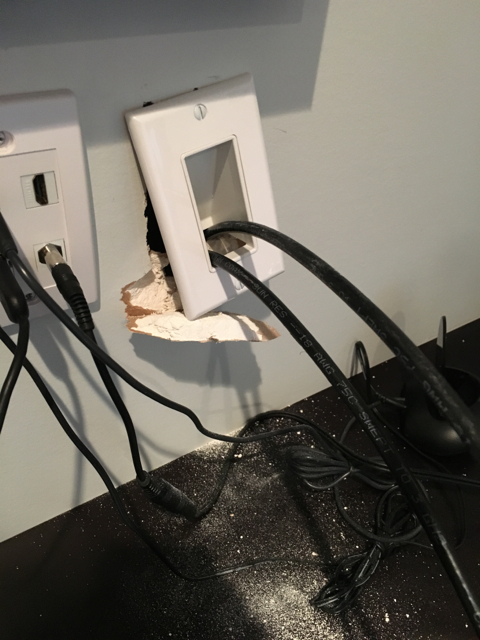
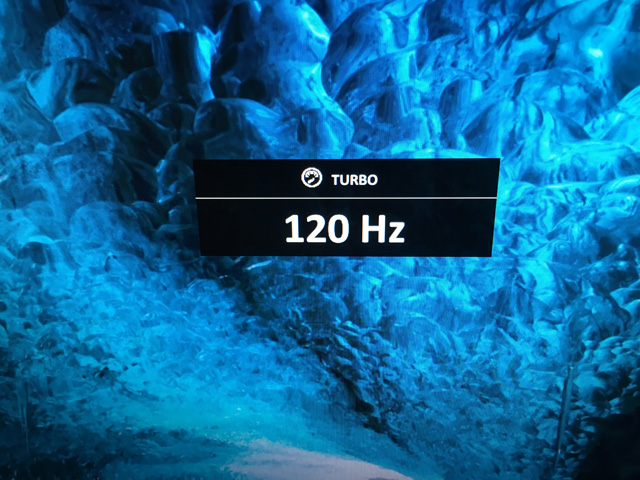
 As mentioned previously, along with a new video card I also got a new monitor. Now, two months later it's finally hooked up. Like the title says this was a pure test of will. I did not think I'd ever get it done. The main issue was that it used Displayport instead of HDMI. So I had to get a suitably long cable to reach to the equipment rack in the basement. Of course none of the vendors selling these hellishly (~$200) expensive cables would guarantee they would work based on the lengths I needed. So all I could do was order and cross my fingers that they'd be ok. So how long was the cable I needed? Well I based it on the audio cable I bought off eBay when back when I decided to install a headphone jack in the office. The description in the listing said '30 feet/10 meters'. Based on that I figured I needed a 30 foot cable. So I found a vendor and ordered it from them. It arrived, I hooked everything up at the equipment rack to test and all was good. It was able to operate at the maximum 144Hz at a resolution of 2560x1440. Next up was to run the cable through the pre-existing conduit I had run from the rack to my office. I already had a lead in place and taped the cable to it and tried to pull it up and out the other end. Never having done this before I didn't know how much resistance to expect. So at one point it stopped moving. And in an effort to get it going I yanked fairly hard a couple times on the cable. Sure enough the drywall couldn't stand the strain and broke open. I'm pretty sure my neighbors across the street could hear the resulting screaming and swearing. After calming down I tried it again later in the day and was able to get it pulled through - but it was too short! By about 3 feet. Frustrated I pulled it back out and ordered a longer cable from them. After it showed up I hooked everything up at the equipment rack and it didn't work at all. I'd get an image for a few seconds but then it would drop, come back for a few seconds and drop again. Obviously the run was to long for the signal. So I found a different vendor online and ordered the correct length (30 feet) from them. It showed up, I tested it and everything was good, so I ran the cable through the conduit - and it was too short again!!! What the hell was going on? So I double checked the original eBay description and it finally dawned on me. 30 feet is NOT 10 meters. 33 feet is! I went and looked at a number of listings on Amazon, eBay etc. and they all said '30 feet/10 meters'. More screaming and swearing ensued. The thought of suing them all briefly popped into my head. So I ordered a 35' cable from the last vendor, it showed up, and it sorta worked. But I could only get it to run at 85Hz. While better than my old monitor's 60Hz, it was still a far cry from the maximum supported rate the monitor could display. At this point I started considering moving my rackmount PC out of the equipment rack it was in and buying one of those 6U wallmount racks and installing it all on the other side of the room. That would have solved all my problems, but I really didn't want to do that as it'd interfere with all the shelving I had already installed for all my movies. In a last desperate attempt I searched and found a third cable vendor. After communicating with them they assured me their cable lengths were truly 10 meters or 33 feet and I ordered from them. A few days ago it showed up. I tested it and was able to get 120Hz - at that point I was ecstatic, no it wasn't the max, but considering all the crap I went through up to that point I was ok with it. I ran the cable, but had issues fishing it the last bit to the outlet and was ready to start smashing things again when the wife in her quiet, soothing way was able to calm me down and we managed to get it through. I hooked the monitor up in the office and everything worked.
The only downside, is the cable is still (of course) a little bit to short. Everything is connected, but it's pretty tight. I had to move the rack over a few feet to be able to connect the PC. But I'm happy with the result. Surprisingly the physical size of the monitor seems to be less than my old monitor, likely because the old one had a much wider bezel. I bumped up the text size to 125% as I found the default size to be a little bit small for my crappy eyes. The only issue I found is that older apps aren't able to tie into the system wide setting and still show text in the smaller size. But for any relatively modern app they display properly. It was with immense smugness that I could say I had my computer downstairs with just the monitor, keyboard, and mouse upstairs in my office. But this was the one instance where my cleverness bit me in the ass. But it's finally done and working. Next up is to install and spend the winter months playing Fallout 4... |


| Sleep Mystery - Sep 19, 2016 | ||
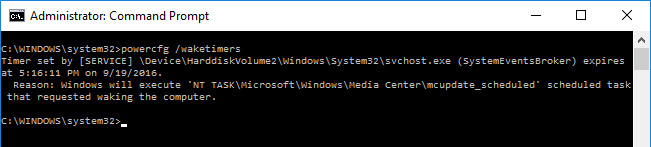
I recently bit the bullet and took advantage of Microsoft's free upgrade to Windows 10 before the deadline expired. Surprisingly, the upgrade was seamless and I didn't encounter any issues. I went through and ran various programs and they all ran fine. Frankly the whole experience was a bit underwhelming. I mean come on! Give me something to complain about... Well ok. I did notice that whenever I'd walk into my office on any given evening that the system wasn't sleeping. The screen was off, but the keyboard would be lit up so I knew something had woken it out of it's blissful slumber. So the first thing I did was to go into the Control Panel, Security and Maintenance, Automatic Maintenance, Change maintenance settings, and turn off 'Allow scheduled maintenance to wake up my computer at the scheduled time'. The thinking was for whatever reason it wasn't going back to sleep after maintenance ran. But that didn't fix the problem. So I did some digging and came across a neat command line that pointed me in the right direction.
This command lists any active timers. From the details I could see that it was a scheduled task that was the cause. It was also nice enough to show the exact drill down menu structure to get to the offending task in Task Scheduler. As I'm not overly concerned with Windows Media Center checking for updates I didn't have a problem disabling the task. Powercfg is a pretty useful command that can return all kinds of sleep and power related information. Now my computer only wakes when I tell it to wake. |
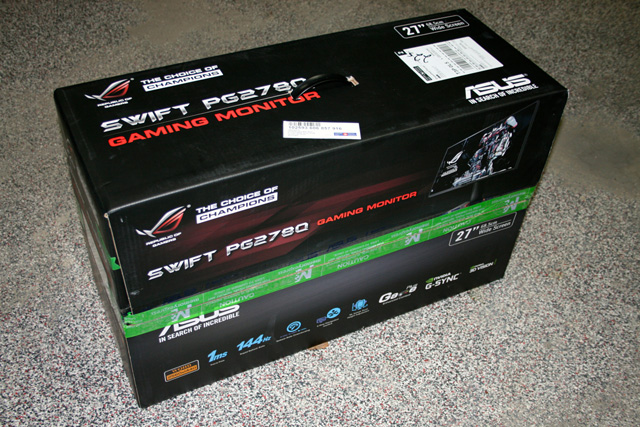
| Graphics Upgrade - Aug 17, 2016 | ||
 With winter here in a few months my thoughts turned to how I was going to manage my upcoming hibernation and I decided that spending hours and hours and hours in a virtual world hunting Deathclaws would do the trick. So I ended up ordering the Pip-Boy edition of Fallout 4. Of course with a new game comes new beefy hardware requirements. While I recently built my new gaming computer I decided at the time not to upgrade my graphics card, instead I bought a 2nd identical card and used ATI's Crossfire connector to squeeze some extra life out of what I had. And for the most part it worked well. Each card would 'draw' every other line on the display and it allowed me to play some of the newer games with higher details and decent frame rates. However in the past few weeks an odd issue popped up - essentially I'd randomly get digital snow flickering on the screen. Not sure if it was the card or my (equally dated) monitor I figured I'd solve all of my issues at once by getting both a new video card and monitor. The Nvidia GTX 1080 had just came out and was getting rave reviews and although hellishly expensive I rationalized it by the fact that I wouldn't have to upgrade again for several years by installing such a powerful monster of a card. As I'm partial to Asus, I sourced it from them. Of course such a high end card requires an equally high end monitor so I splurged for Asus's latest and greatest gaming monitor, the PG278Q.
As you can see from the screenshot the thing is a beast especially compared to my old card. However installation was a snap once I found the appropriate 8-pin power connector on my power supply (actually a 6+2 connector). However I should have done a bit of research before ordering as once I went to set everything up I realized I had a problem. The monitor only has a Displayport connection instead of a HDMI connector. If my PC was in the same room as my monitor that wouldn't be an issue. But instead, it's in an AV rack in a different room (floor) roughly 25' away. After doing some furious Googling of the Displayport standard it appeared at first glance that I wouldn't be able to get a cable long enough which would still give me the resolution and refresh rate that I wanted. However I did find one vendor that according to their specs may or may not work. The only way to know for sure is for me to try. So I plan on ordering the cable and then testing. If it works then I'll have to get my AV guy to come out and replace my existing HDMI wiring with the new Displayport cable. Thankfully when I had everything built I had them run conduit from my AV rack to my office. So as of now I have my new fancy video card, but am still using my old monitor with it's 1920x1200 resolution connected to my existing HDMI wiring. Of course the card is massive overkill at that resolution. I fired up Bioshock Infinite and maxed out the quality settings and the game ran almost too fast to be enjoyable. But if I can't resolve the cabling issue that's what I'll be stuck with... |

| To Wii, or not to Wii? - Jul 24, 2016 | ||
 Awhile ago I picked up a Wii U. We had just moved into a new house and were getting a media room built and as part of that process I wanted to incorporate Nintendo's latest gaming system into that space. In the end it didn't end up there as I was paranoid my fancy Panasonic plasma would suffer burn in from gaming - instead it's final destination was to be in the garage, over a year after I bought it.
At this point though I wouldn't recommend anyone buying the Wii U unless they were able to get one used or get a really good deal. The Wii has always filled a different niche than the other consoles awash in their first person shooter titles. It was always more about fun interaction with friends and family, making use of of the motion sensing controllers, and getting people up off the couch and moving around while playing. Hopefully their next generation platform will continue embracing that philosophy when it comes out some time next year. |

| What Privacy? - May 28, 2016 | ||||
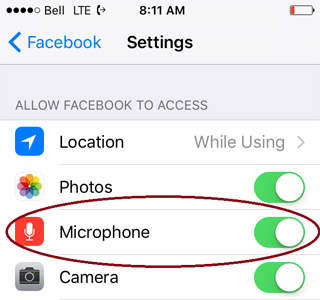
 You know those EULA agreements that you just click on to dismiss every time there's a new product update? The one's you never bother to read before you agree to them? Perhaps you should actually go through them occasionally... First up is news that Facebook will record and analyze sound through your iPhone's microphone whenever you use it to do a status update. So for instance, say you're listening to Taylor Swift on the radio while posting adorable videos of your cat. Soon after you start getting ads in Facebook for her new album which just dropped. Or alternatively, you're yammering away to your girlfriend about what hotel you should stay at during your Hawaii trip, and coincidentally next time you log on to Facebook you're helpfully shown ads for the Waikiki Hilton. Now you know why. Once word got around of this latest 'feature' of course Facebook cheerfully reminded everyone that you have to enable it as it's disabled by default. Strangely though, both my phone and the wife's had it enabled - and yet we never turned it on. Personally I don't like having my life analyzed so as to further bombard me with enticements to spend more of my money. To turn off, got into Settings, Facebook, Settings, and deselect Microphone.
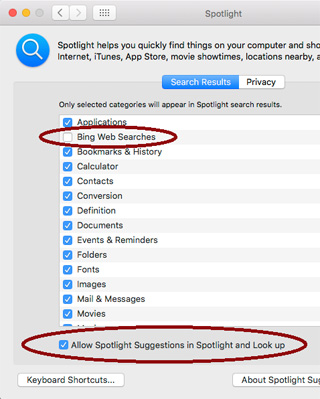
Apple also is up to similar shenanigans with it's latest 'feature' in Spotlight. Introduced with OS X Yosemite and present in the latest version El Capitan, by default whenever you do a search on your computer your search terms are sent to Apple which then distributes them to third parties including Microsoft. All ending up in one massive database for all eternity to be analyzed and mined at will.
To turn off, go into System Preferences, Spotlight, and uncheck 'Bing Web Searches' and 'Allow Spotlight Suggestions in Spotlight and Look up'. Some people might not think it's a big deal, but it's at least somewhat ironic considering the big stink Apple made in it's fight with the FBI over being forced to decrypt iPhones and it's public defense of it's users privacy being sacrosanct. In all these instances you can protect your privacy by turning things off - typically only after finding out about them through other users discovering them and being outraged - but you have to think that it's only a matter of time before people are no longer even given the choice. |
| iMac Upgrade - May 22, 2016 | ||||||||||||||||||||||||
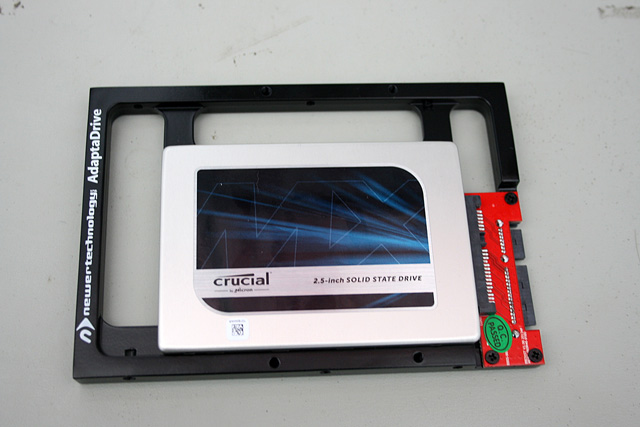
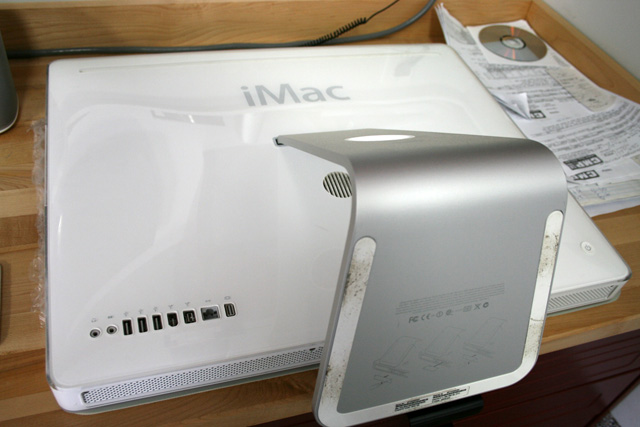
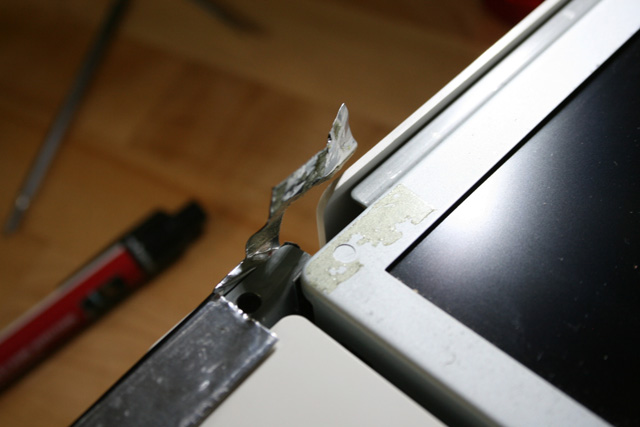
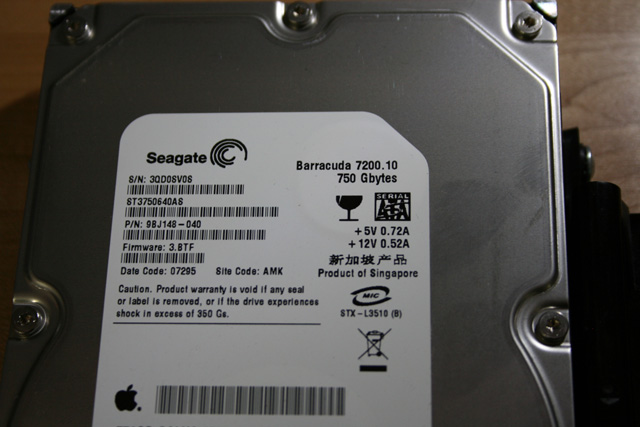
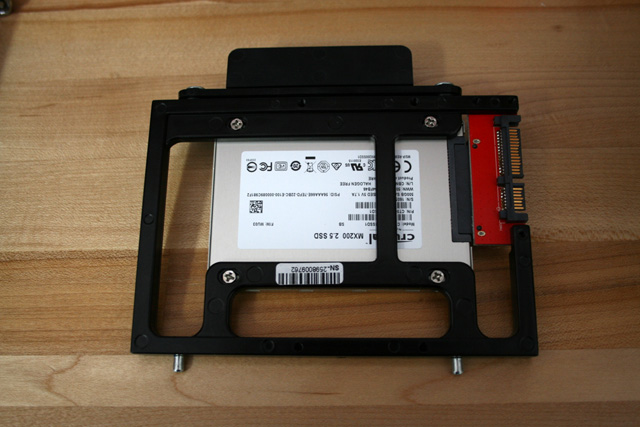
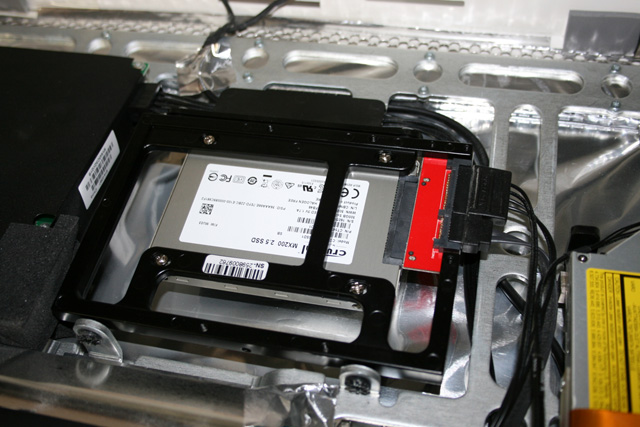
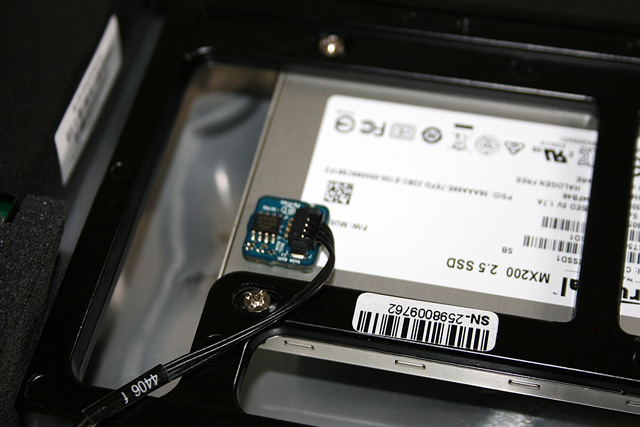
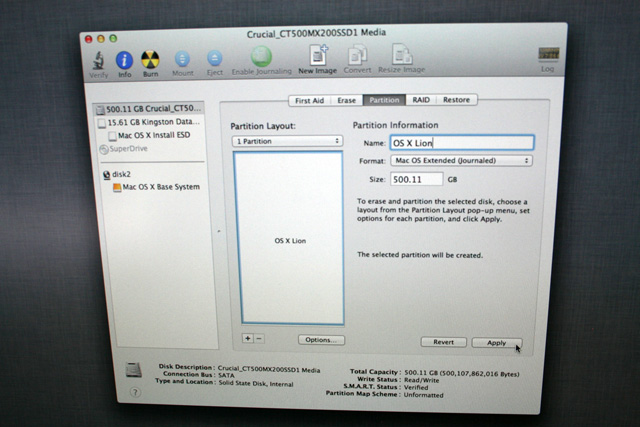
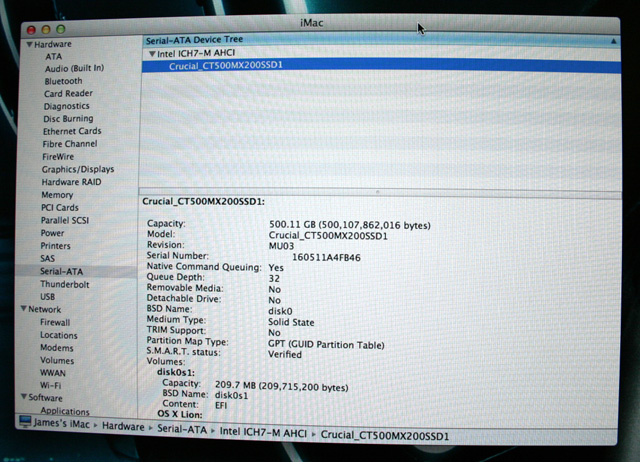
 I've been wanting to swap a SSD drive into my 24" iMac (2006) for awhile now but have held off due to concern over how much a pain the process would be and fear of breaking something. Recently however my screen started to display graphical glitches occasionally which in all likelihood is a result of the thermal paste being old and cracking/no longer adhering properly. So I decided since I needed to deal with the video card I might as well do the hard drive at the same time. Never having done this before though, I figured I'd tackle the hard drive first as with it you don't need to completely remove the logic board like you have to with the video card. I managed to find a brand new Nvidia 7600GT card off eBay which is amazing considering how rare they are. But I think I'll keep it as a spare and instead remove and re-apply the thermal paste on the existing card. But first, the task of replacing the hard drive... I ordered the drive from Crucial as I've used them in the past to buy memory upgrades and their website will certify various drives to work with various Apple computers. I ended up picking a 500GB model they listed as compatible with my vintage iMac. I also ordered a 3.5" to 2.5" drive carrier converter bracket. I know a lot of people simply use velcro tape to affix the SSD, but I wanted to do it properly. Once everything showed up it was time to start the upgrade. I went online and watched literally a dozen videos on YouTube on how to do the upgrade. In each video they showed the person opening the case using a credit card inserted through the vent slot. This is done to unlatch the bezel allowing it to be removed. And here we had my first major frustration. I could not get the thing to open. I then found out there's a specific Apple tool for this process and ended up ordering it. Not long after I stumbled across a video where someone showed you how to make your own simply by taking a rewards type plastic card and using boiling water to soften it and then bend it into shape. So I did that, but again, i could not get it open. I then tried it on my 17" iMac and after only a few tries got it to work. So what was going on? Well it turns out that Apple in it's infinite wisdom decided to use a different method to open a 24" iMac. Everything online that shows them using one of these cards only works on the 17" and 20" models!!! The only reason I found this out is after stumbling across the official Apple service manual - which in hindsight I probably should have looked at first. It's actually super easy to open the larger model, you simply unscrew the memory slot holder and the bottom screws, remove the memory, squeeze together the plastic memory guide clips and lift up the bezel. You are then supposed to remove the cable for the camera and microphone and while I was able to detach one of the cables easily the other one was all taped together. It looked pretty delicate so I decided against messing with it and instead simply leaned the bezel against the wall and left it connected.
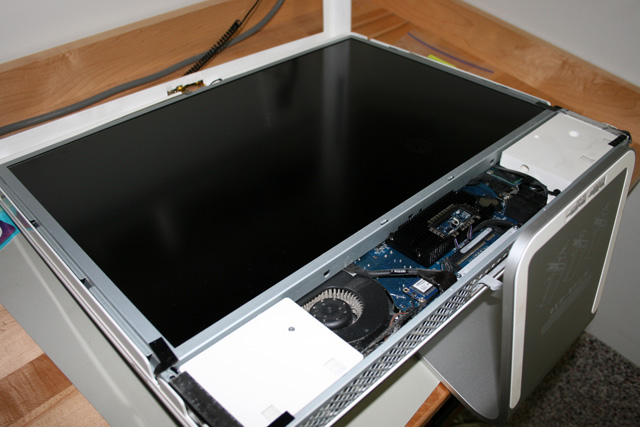
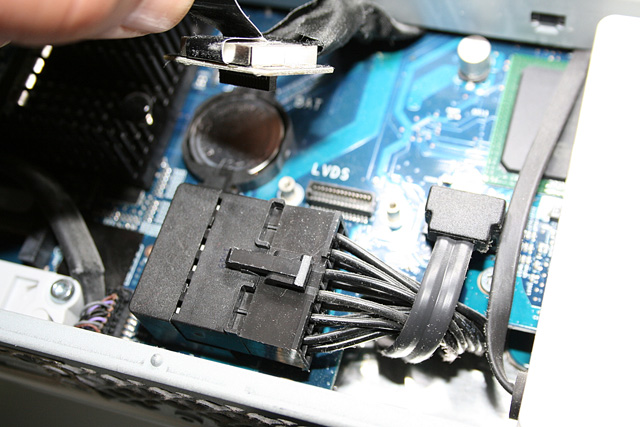
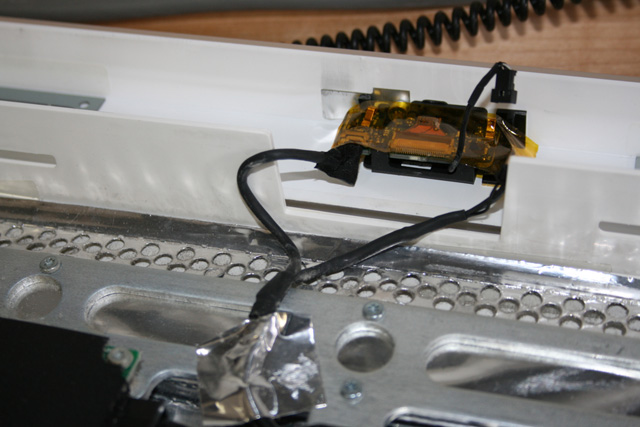
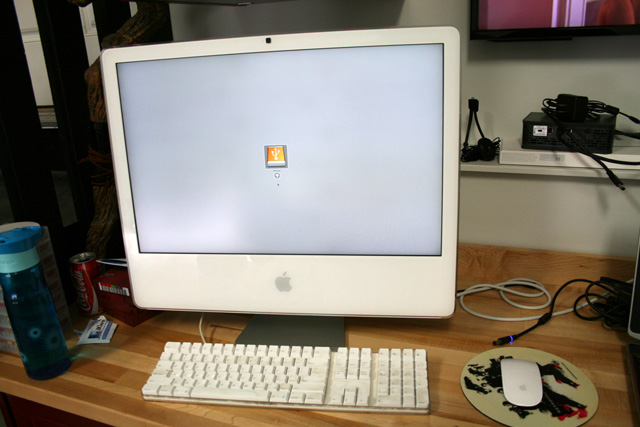
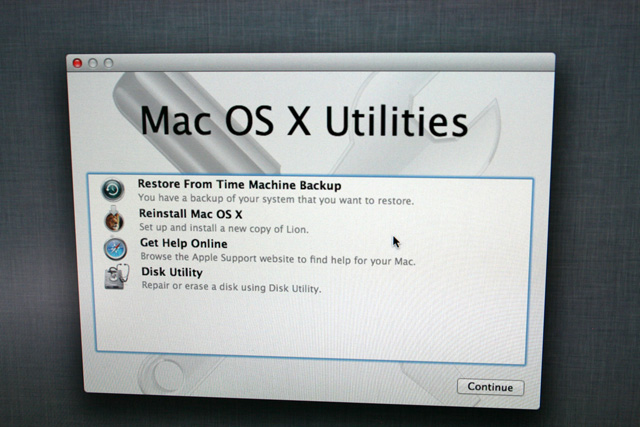
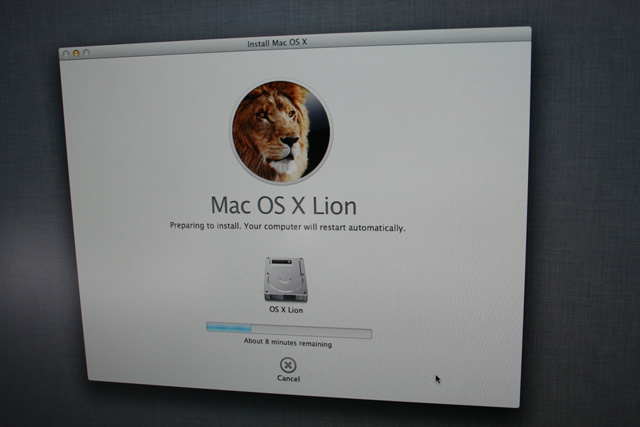
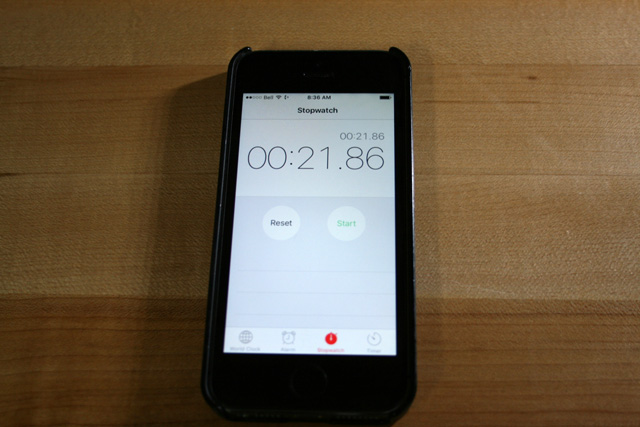
From there it was a matter of unscrewing a couple screws on the LVDS cable and popping it loose and then removing the inverter cable. Now here was where I encountered my second frustration. The inverter cable is very brittle and I would bet anyone trying to pry it off by pulling on the cable itself would rip off the leads and end up ruining your iMac in the process. So instead I carefully worked the connector prying each side up bit by bit until it finally popped off. There was then eight screws to remove around the display and two pieces of aluminum tape on each side that I had to carefully peel back. And with that I was able to remove the display. Then it was a matter of disconnecting the existing drive. First I removed the SATA and power connectors and squeezed down on the metal clip at the top of the drive carrier which popped it open and allowed me to swing open the carrier and remove it - there was also a connector for the attached thermal sensor which was easy to remove. I removed the two screws on the one side of the drive holding the clip and then the two 'posts' on the other side and attached them to the SSD with it's converter bracket. I then carefully pried off the thermal sensor from the old drive and thankfully there was enough glue still attached that I was able to affix it to the new drive. Then I re-attached the drive cables and sensor cable and put everything back together again. I powered on the system and was relieved when I got the familiar chime. Holding down the option key I had it boot into the Startup Manager. I then selected the USB boot key I had previously created which had an install of OS X Lion - which is the last supported OS for that system. A bit of panic ensued when I saw that the SSD wasn't recognized. Then I realized it had to be formatted first and I looked up the required settings to do so. Once that was done the drive was recognized and I was able to install Lion onto it. I did a quick comparison of the boot up times before and after and the difference was pretty substantial. In addition, now that it's been upgraded everything runs much smoother. I still need to do the video card at some point, but for now I'm going to kick back and just enjoy my vintage Mac that's been given a new lease on life. |


| Exchange Puzzler - Apr 8, 2016 | ||||
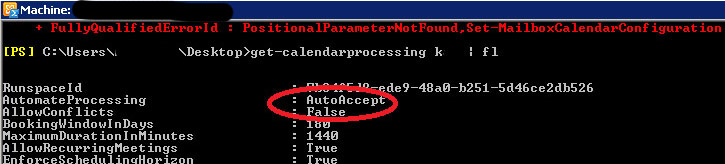
Got a call recently from a colleague at work who was having an odd issue. Every time he got an email in Outlook it would immediately go into his Deleted Items folder. He works in IT and deals with Outlook on a regular basis so he knows more than the typical user. As such he went through and checked all the obvious things - He didn't have any rules turned on, tried with both cached mode on and off, had turned off his iPhone, and also encountered the same problem when just running Outlook Web Access (OWA). As it was also doing it in OWA I knew that meant it wasn't an Outlook issue, but was instead related to his account. And as no one else was having the problem I knew it wasn't something systemic to Exchange. So we both wracked our brains for a bit and took to Google for possible solutions. Eventually we came across an article that mentioned in some instances that the mailbox gets its AutomateProcessing flag messed up. For resource mailboxes you want them set to AutoAccept and normally it won't allow you to set a user mailbox to AutoAccept. But sometimes (the reason why wasn't entirely clear) a user mailbox will get set that way which causes the behavior of automatically moving incoming email to the Deleted Items folder. The articles then detailed that to fix you simply ran the Shell and punched in the following command: set-mailboxcalendarsettings "domain/ou/user" -automateprocessing: Autoupdate However it'd always return an error stating it didn't recognize the command. And here again we have the problem with Googling a solution. Most of what is out there is simply wrong. In this case, all these articles that mentioned running this command failed to mention they were talking about Exchange 2007. As we are running Exchange 2010 it has a different set of commands. So after doing some more digging I finally came up with the proper syntax:
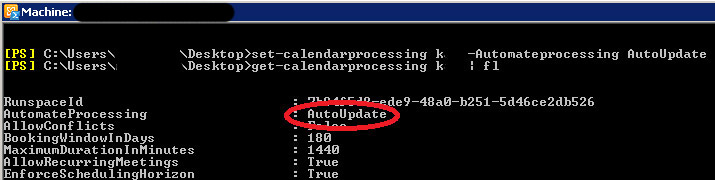
So the proper command is: Set-CalendarProcessing <username> -Automateprocessing AutoUpdate As you can see in the screenshots his mailbox was indeed set to the wrong setting. After making the switch everything was working properly again. We talked a bit more about it and it appears that just prior to things breaking he was working on accounts and opening multiple mailboxes from within his profile to make changes. Obviously something along the way caused the setting to get messed up. |
| Replication Woes - Feb 15, 2016 | ||
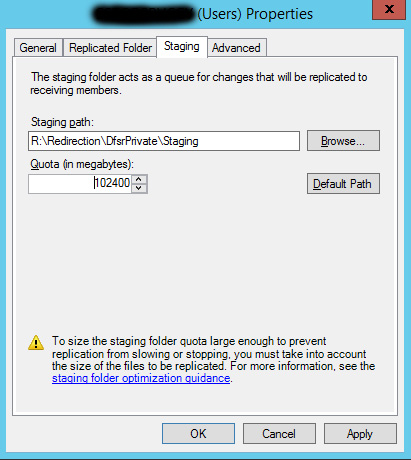
We use DFS Replication to copy redirected folders off our tablets onto a file server in another site for disaster recovery. Recently, however we started getting errors in the event log complaining that we were exceeding the staging quota: Event ID: 4208 The DFS Replication service detected that the staging space usage is above the staging quota for the replicated folder at local path (path). The service might fail to replicate some large files and the replicated folder might get out of sync. The service will attempt to clean up staging space automatically. Ok great, but what size to set the quota to be??? After doing some digging I found a handy Powershell script which will go and search through the target folder and add up the largest files and give an appropriate value you can enter in the Staging properties: $big32 = Get-ChildItem c:\temp -recurse | Sort-Object length -descending | select-object -first 32 | measure-object -property length –sum $big32.sum /1gb Obviously you can edit the value to make is search more than the top 32 files, however for Windows 2008 R2, 32 is the recommended search value.
Once you have that value, all you need to do is to go into the DFS Management console, click on the Replication group under the Replication node, on the memberships tab right click on the replicated folder and select Properties. Click on the Staging tab and update the quota value to match the one returned by the script. Changes will take place during the next DFSR polling cycle. Now those pesky event errors should go away and replication work more smoothly. |
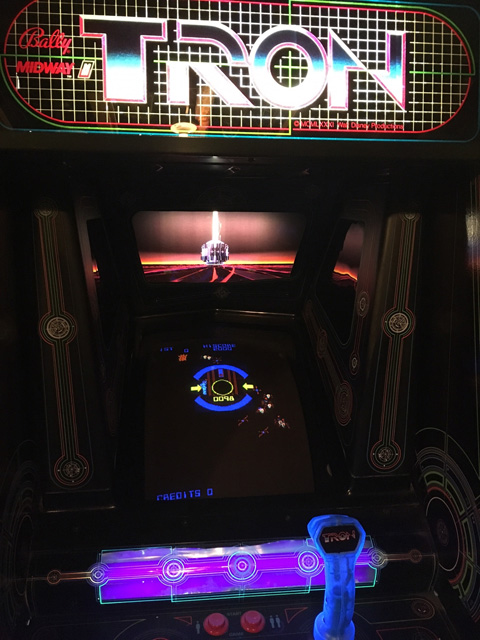
| Tron Restore - Jan 24, 2016 | ||
Now that the basement is mostly done, I found some time to work on my arcade games. Sadly they've been neglected ever since we moved a couple years ago. I finally decided to work on my Tron upright as I thought it'd be a straightforward fix. The issue with it was that ever since I had it, the MCP translite (lit graphic at the back, above the monitor) didn't light up. I never thought much of it initially as I figured the light bulb was simply burnt out. So I cracked open the manual, looked at the various parts and diagrams and saw that it used an 18" fluorescent tube assembly. I guessed all I had to do was simply grab a replacement bulb from Home Depot and pop it in and it'd be good as new. However when I finally got around to opening the back up - I found that the entire lighting assembly was missing. Not broken, entirely gone! Not only that, but after temporarily shining a light through the back I noticed that the translite had a tear through the middle that the previous owner had tried to fix by simply taping over it. So I went online and found someone selling one that was in much better condition. Now I just had to figure out the lighting issue.
According to the manual I needed the tube, ballast, and a starter. I made some inquiries on KLOV which led me to a website that sold various arcade and pinball parts. After contacting the owner he said to simply grab one from Walmart for $10. At first I thought he was being a smart ass, but after questioning him on it I realized what he was talking about. You can now get fluorescent lights that come in one integrated piece. No need to buy all the separate components - and they run off a regular plug-in outlet which there just happens to be at the bottom of the game. I picked one up and thankfully the power cord was just long enough to reach the outlet. There is a wood strip that goes along the back so I simply used a couple of tie wraps to affix the light to it. I then went to fire up the game and got that sick feeling when it didn't power on. After looking closer I noticed a piece of wood from the cabinet had fallen inside and ripped out some of the wiring from the monitor to the power supply. The wires in question were from the AC outlets of the supply so I took a gamble that there was no polarity and that I wouldn't fry things by connecting the wrong wires together. I tied the wires together, tried it again and success! Everything powered on. Next I ripped out the old translite and replaced it with the newer one I had bought. Unfortunately there's some speckling on the plastic shroud itself which despite my best efforts I couldn't get out. Still, as you can see from the picture it looks pretty sharp. Last thing I did was to tweak the vertical hold of the monitor as there was always a slight shimmering line to the right of the screen. Now that's gone and the image looks rock solid. Time to fire up the Light Cycle! |